Windows Inter Process Communication A Deep Dive Beyond the Surface - Part 4

Welcome to the fourth part of the IPC series — and the third part focused specifically on RPC. Today, we’re going to talk about: RPC security, which will help complete the picture we've been building around how RPC works under the hood.
RPC security is a deep and complex topic, mostly because there are so many different ways to secure RPC servers — and those methods have evolved significantly over the years. Today, and in the next parts. I’ll try to cover all the major aspects of RPC security so you get a clear understanding of the options, mechanisms, and challenges involved.
Today, we’re going to dig into binding authentication — how your server can register an authentication service to allow clients to authenticate, how the client performs that authentication, and how the client can specify the authentication level. We’ll also look at what each level means in practice and how it shows up in network traffic.
As with the previous parts, I want to start by mentioning the resources behind this work. This post is based on my own research, along with:
- Microsoft’s official documentation (MSDN),
- The excellent work by @0xcsandker on offensive Windows IPC,
- James Forshaw’s blog post,
- And Ben Barnea’s detailed write-up on the Akamai blog.
This will likely be the most challenging parts of the series so far — so get ready, and let’s dive in!
RPC Security
The Remote Procedure Call (RPC) runtime provides a standardized interface for authentication — available to both clients and servers. On the server side, it uses the system’s authentication services (like NTLM or Kerberos) to validate connections. Applications can use authenticated RPC to ensure that:
- All incoming calls are from trusted clients, and
- All responses come from verified servers.
There are several ways to secure an RPC server, but before we get into the different methods, let’s start with the basics: authentication in RPC.
Binding Authentication
An RPC server can register supported authentication methods, such as Kerberos or NTLM. The client is then expected to perform binding authentication using one of the supported methods.
The client can also specify:
- The authentication protocol it wants to use
- The authentication level (which defines how much protection the call has)
Registering Authentication: RpcServerRegisterAuthInfo
To enable authentication in your RPC server, you need to register an authentication service using the RpcServerRegisterAuthInfo function.
Here’s the function definition:
RPC_STATUS RpcServerRegisterAuthInfo(
  RPC_CSTR                  ServerPrincName,
  unsigned long             AuthnSvc,
  RPC_AUTH_KEY_RETRIEVAL_FN GetKeyFn,
  void                      *Arg
);
Let's check the arguments:
ServerPrincName
This is the server principal name, and it must match the authentication service you're using.
- For Kerberos, this is typically an SPN (Service Principal Name), and it needs to be registered correctly in the Kerberos database for authentication to succeed.
- For NTLM, this parameter can be
NULL.
AuthnSvc
This defines which authentication service to use. Common options include:
RPC_C_AUTHN_WINNT– NTLMRPC_C_AUTHN_GSS_KERBEROS– Kerberos
Here’s the full list of supported values:
#define RPC_C_AUTHN_NONE            0
#define RPC_C_AUTHN_DCE_PRIVATE     1
#define RPC_C_AUTHN_DCE_PUBLIC      2
#define RPC_C_AUTHN_DEC_PUBLIC      4
#define RPC_C_AUTHN_GSS_NEGOTIATE   9
#define RPC_C_AUTHN_WINNT          10
#define RPC_C_AUTHN_GSS_SCHANNEL   14
#define RPC_C_AUTHN_GSS_KERBEROS   16
#define RPC_C_AUTHN_DPA            17
#define RPC_C_AUTHN_MSN            18
#define RPC_C_AUTHN_KERNEL         20
#define RPC_C_AUTHN_DIGEST         21
#define RPC_C_AUTHN_NEGO_EXTENDER  30
#define RPC_C_AUTHN_PKU2U          31
#define RPC_C_AUTHN_LIVE_SSP       32
#define RPC_C_AUTHN_LIVEXP_SSP     35
#define RPC_C_AUTHN_CLOUD_AP       36
#define RPC_C_AUTHN_MSONLINE       82
GetKeyFn
A custom key-retrieval function (usuallyNULLfor NTLM or Kerberos).
It’s only required for custom authentication providers.-
Arg
An optional argument for the key-retrieval function. Again, for NTLM, this is typicallyNULL.
In our work, we’ll focus on NTLM because it’s simpler to configure.
Here’s how registering NTLM authentication might look in code:
status = RpcServerRegisterAuthInfo(
    NULL,                // Server principal name (NULL for NTLM)
    RPC_C_AUTHN_WINNT,   // NTLM as authentication service
    NULL,                // Default key function (ignored for NTLM)
    NULL                 // No argument for key function
);
This tells the RPC runtime to accept and use NTLM authentication from clients.
Client-Side Binding Authentication:
After seeing how the server registers its authentication service, let’s move to the client side and see how the client actually uses that authentication — this process is known as binding authentication.
As discussed earlier, a binding handle is just a pointer to a structure used by the RPC runtime to store connection-related data — and authentication information is one part of that structure. When the client configures authentication for the handle, that’s called binding authentication.
To configure this, the client uses the API:
RPC_STATUS RpcBindingSetAuthInfoExA(
  RPC_BINDING_HANDLE       Binding,
  RPC_CSTR                 ServerPrincName,
  unsigned long            AuthnLevel,
  unsigned long            AuthnSvc,
  RPC_AUTH_IDENTITY_HANDLE AuthIdentity,
  unsigned long            AuthzSvc,
  RPC_SECURITY_QOS         *SecurityQos
);
Let's break the arguments:
Binding
The binding handle (already created viaRpcBindingFromStringBinding).ServerPrincName
The Server Principal Name (SPN). This must match the expected name for Kerberos. If you're using NTLM, this can beNULL.AuthnLevel
The authentication level — this defines how secure you want the connection to be (e.g., none, connect-only, per-call, encrypted). We’ll break this down in a minute.AuthnSvc
The authentication service to use. For example:
RPC_C_AUTHN_WINNTfor NTLMRPC_C_AUTHN_GSS_KERBEROSfor Kerberos
This must match the service that the server registered which we saw earlier RpcServerRegisterAuthInfo.
AuthIdentity
A pointer to the identity credentials (username, domain, and password). When using NTLM, you use theSEC_WINNT_AUTH_IDENTITY_Astructure:
typedef struct _SEC_WINNT_AUTH_IDENTITY_A {
  unsigned char *User;
  unsigned long UserLength;
  unsigned char *Domain;
  unsigned long DomainLength;
  unsigned char *Password;
  unsigned long PasswordLength;
  unsigned long Flags;
} SEC_WINNT_AUTH_IDENTITY_A, *PSEC_WINNT_AUTH_IDENTITY_A;
Example in code:
SEC_WINNT_AUTH_IDENTITY identity;
memset(&identity, 0, sizeof(identity));

identity.User = (unsigned short*)L"MyUserName";
identity.UserLength = wcslen((wchar_t*)identity.User);

identity.Domain = (unsigned short*)L"MyDomain";  // or empty for local
identity.DomainLength = wcslen((wchar_t*)identity.Domain);

identity.Password = (unsigned short*)L"MyPassword";
identity.PasswordLength = wcslen((wchar_t*)identity.Password);

identity.Flags = SEC_WINNT_AUTH_IDENTITY_UNICODE;
AuthzSvc
Defines the authorization service. Often set toRPC_C_AUTHZ_NONE.SecurityQos
A pointer to theRPC_SECURITY_QOSstructure, used mainly to control impersonation. This tells the server how much it can act on behalf of the client.
(We’ll cover impersonation in IPC in a later part. For now, this can beNULL.)
Let’s now look at the AuthnLevel parameter — this controls how secure the communication should be. The client sets this, and it affects whether authentication is required, and how much protection is applied to the RPC traffic.
There are six levels of authentication as you can see in the table below
RPC Authentication Levels
| Level | Name | Description |
|---|---|---|
| 0 | RPC_C_AUTHN_LEVEL_DEFAULT | Uses the default authentication level for the security provider. Often maps to Connect or None, depending on context. |
| 1 | RPC_C_AUTHN_LEVEL_NONE | No authentication. The client is not identified. |
| 2 | RPC_C_AUTHN_LEVEL_CONNECT | Authenticates only at the time of connection. Once connected, no further identity checks. |
| 3 | RPC_C_AUTHN_LEVEL_CALL | Authenticates each individual call to ensure it’s coming from the authenticated user. |
| 4 | RPC_C_AUTHN_LEVEL_PKT | Ensures data integrity – the data hasn't been tampered with during transit. |
| 5 | RPC_C_AUTHN_LEVEL_PKT_INTEGRITY | Same as level 4. Used synonymously. |
| 6 | RPC_C_AUTHN_LEVEL_PKT_PRIVACY | Ensures data confidentiality by encrypting the data (in addition to integrity). This is the most secure level. |
Worth to note that The server has no built-in way to enforce a minimum authentication level during binding. That means it's possible for a client to connect with a lower level than you expect.
To truly enforce secure authentication, the server must implement additional validation logic — such as using the RpcBindingInqAuthClient API to check what authentication level the client used, and grant or deny access accordingly. Another option is to use specific flags to prevent unauthenticated access.
We’ll cover both approaches in more detail when we will talk about other security measures.
Now let’s break down what authentication levels actually mean in RPC — and how they appear in network traffic.
Let’s explore some of them:
1. Authentication Level: None
As the name suggests, this level means no authentication is used. The client doesn’t send any credentials, and the server has no way to verify the identity of the client.
This level is equal to not using authentication at all, so we will just used our old client/server but the communication this time will be over the network, you can check the client and server here.
Note: We'll go deeper into RPC over the network when we talk about marshalling later. For now, this is just to demonstrate how authentication looks in traffic.
I used a basic client and server setup with network communication.
To get the same results as mine, you should run the server and client on different machines, and don’t forget to update the IP address of the RPC server in the client’s binding handle accordingly.
Here’s what you should do:
- Start Wireshark and begin capturing network traffic.
- Run the server.
- Then run the client.

In the captured traffic above, you’ll see something like this:
1. The first packet is a bind request — the client asking to bind to the interface.
2. The second packet is a bind response from the server.
3. The third packet is the actual remote procedure call (in our case, PrintString).
4. The final packet is the response returned by the server.
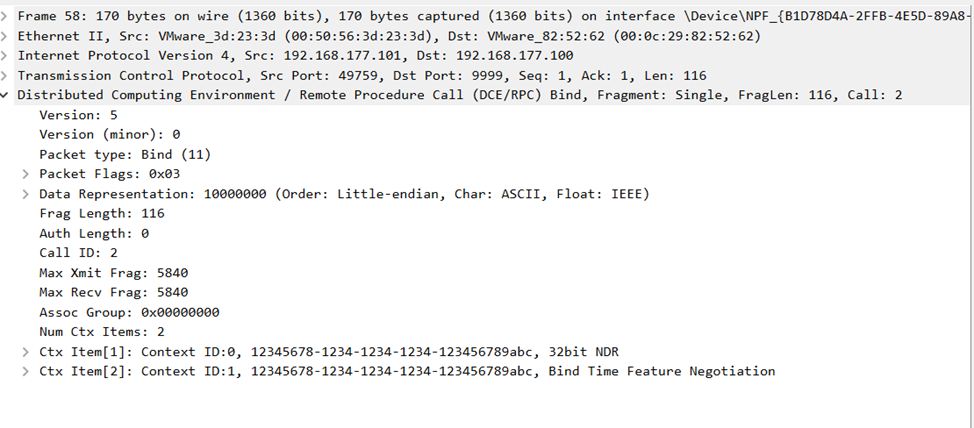
Now, if you open the RPC bind request and check the headers, you’ll see that the authentication length is zero. This confirms that the authentication level used is: RPC_C_AUTHN_LEVEL_NONE
In other words — no authentication was used at all.
Here’s a screenshot that shows this behavior in Wireshark:
As mentioned earlier, we’ll explore RPC over the network more deeply in a future section. But if you want a head start or need some background, feel free to check out my research here.
2. Authentication Level: Connect
Now let’s move on to the next level: RPC_C_AUTHN_LEVEL_CONNECT.
This level authenticates only at the time of connection — during the initial bind phase. Once the connection is established, no further identity checks are performed. That means only the bind packet is authenticated, and subsequent remote procedure calls won’t include authentication data.
You can find a sample code for this scenario here, applying all authentication functions discussed earlier
Just make sure to run the client with valid credentials for an authenticated Windows account, and update the IP address of the server accordingly.

Here’s a capture of the network traffic when using Connect-level authentication:
- In the second packet, you’ll see the server sends an NTLM challenge.
- In third packet , the client responds with its NTLM response.
- After that, the client proceeds with the remote procedure call.
Let’s see the bind packet now
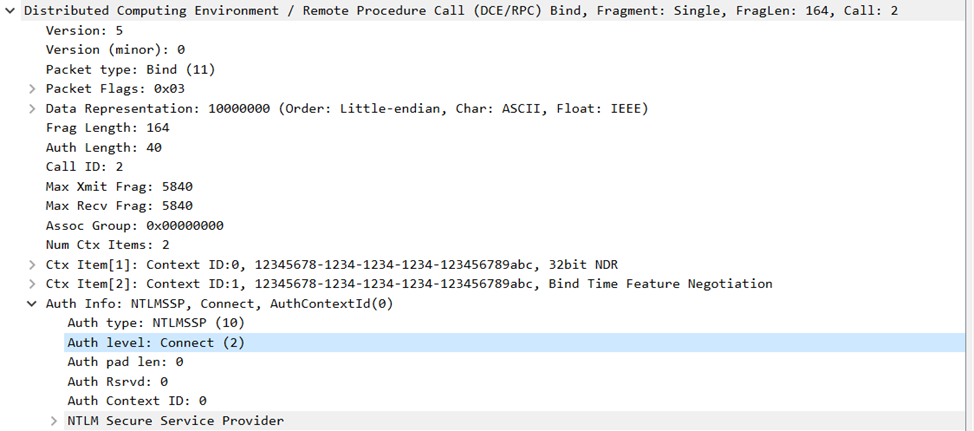
You’ll see that the authentication level is set to CONNECT and the Auth Length header not equal to zero anymore.
Let’s check now the function call

As expected, there’s no authentication data included.
This is how connect-level authentication works: identity verification happens once, and that’s it.
Before we move on to the next authentication level, there’s something important to clarify:
Even if we use this server which registers an authentication service, our old client without any authentication can still connect. That’s what I mentioned earlier — just registering an authentication service on the server doesn’t guarantee that clients will actually authenticate themselves.
To enforce this, the server needs to implement additional security checks — otherwise, unauthenticated clients can still bind and make calls.
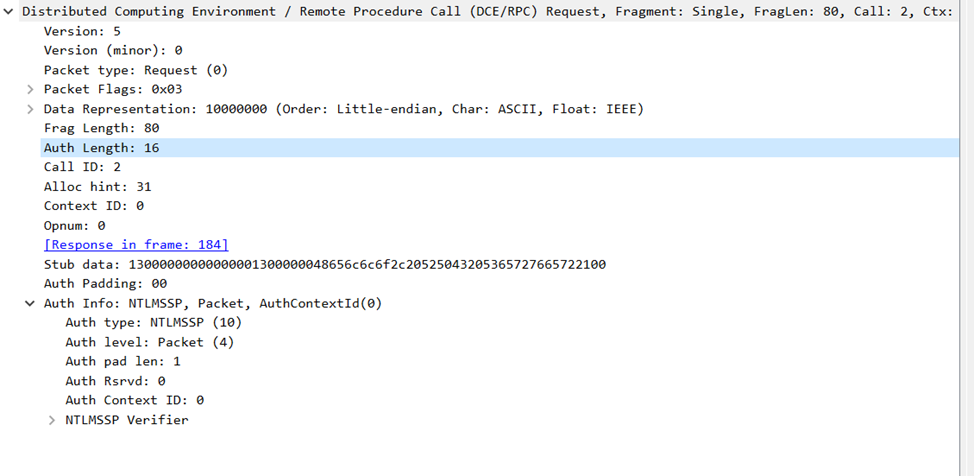
3. Authentication Level: Call
At this level, authentication happens not only during the initial binding, but also with every remote procedure call. This adds an extra layer of security compared to CONNECT, since the server can verify the client's identity on each call.
You can see this in action using the client and server example here.
In wireshark, you’ll notice that function call now includes authentication data, which confirms that authentication is being enforced at the call level.
Here’s a screenshot showing what that looks like in the traffic:
4. Authentication Level: Packet Privacy
This is the highest level of authentication available in RPC. Like CALL level, authentication happens on every remote procedure call, but with a major upgrade:
At this level, the entire RPC traffic is encrypted, and the integrity of each packet is also verified.
You can check out a working example using this level of authentication here.
After running the client and server, inspect the traffic in Wireshark.
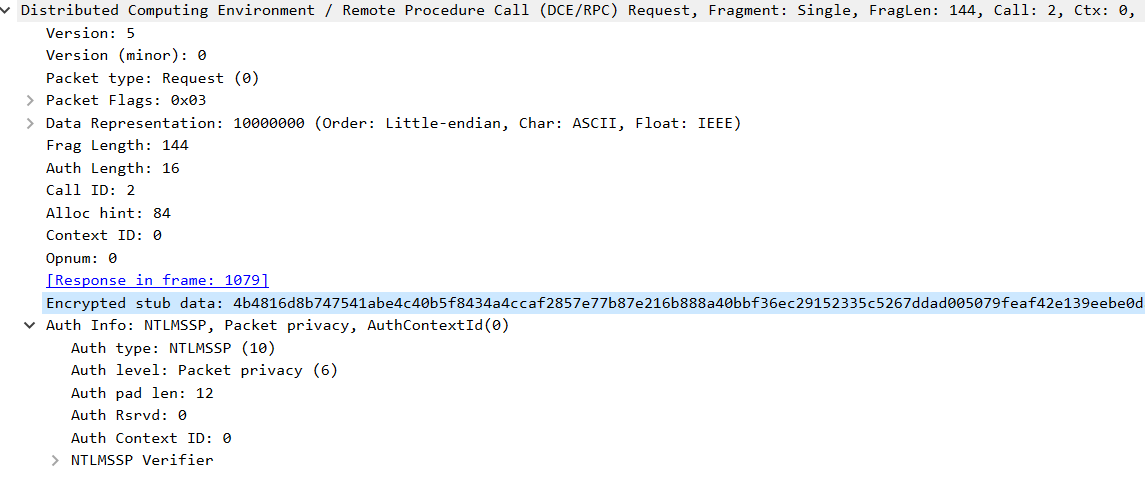
If you look at the packet containing the function call, you’ll notice something new — an encrypted section labeled as:
Encrypted stub data
This indicates that the call's data is fully encrypted, unlike previous levels where the call arguments were visible in plaintext.
In our setup, NTLM is the protocol responsible for providing both encryption and integrity protection.
This process is referred to as:
- Sealing (for encryption), and
- Signing (for integrity checking)
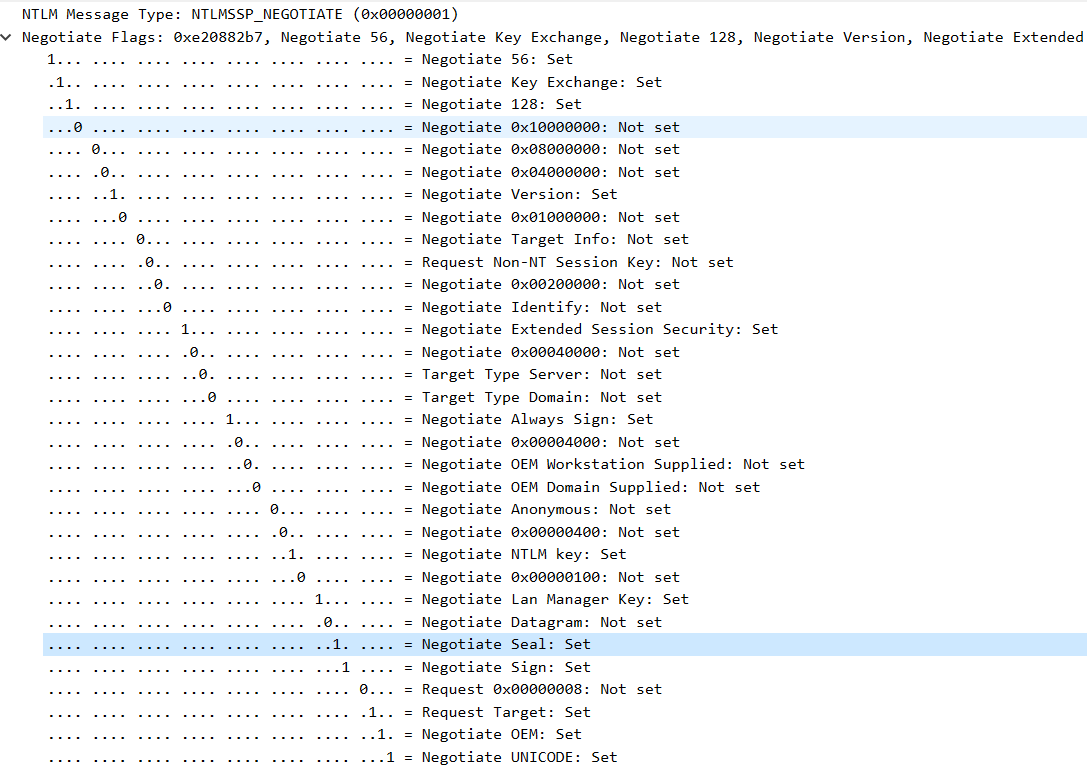
If you look inside the NTLM header in the bind packet, you’ll see that the client has requested both sealing and signing — which was not the case with the lower authentication levels we explored earlier.
Here’s a screenshot from Wireshark that highlights this behavior:
If you want to decrypt RPC traffic in Wireshark — and you're using NTLM as the authentication service (like in our case) — it's pretty straightforward. You just need to provide the client’s password in Wireshark:
Edit → Preferences → Protocols → NTLMSSP → NT Password
Believe it or not, a lot of RPC servers today still expose interfaces that allow access with no authentication (aka, authentication level none). That’s why it’s always worth checking whether you can bind to an interface without creds — and then see what functions you’re allowed to call.
One well-known example is the Windows Netlogon interface, which accepts unauthenticated binding. You can even call a few interesting functions once you're in. My tool NauthNRPC, for instance, binds to the Netlogon interface with RPC_C_AUTHN_LEVEL_NONE and call some function to check whether a specific user exists in the domain.
I prefer to stop today at this point. This is just the beginning of our dive into RPC security. There’s a lot more to uncover, and we’ll dig into even more interesting details in the upcoming parts. Hopefully, binding authentication is clear, see you in the next one!