Windows Inter Process Communication A Deep Dive Beyond the Surface - Part 3

In the previous part, we started digging into RPC — covering the server, the client, the interface, and topics like the endpoint mapper, well-known endpoints, and dynamic ones. Along the way, I mentioned a few things that I’d come back to later — like binding and handle types.
So in this part, we’re going to explore what handles and binding actually mean in the RPC world. We’ll look at the different types of handles, how they work, and how they affect the structure of the client and server code.
Just like before, this post is based on my own work, along with references from MSDN and the great research by @0xcsandker on offensive IPC in Windows.
Alright, let’s dive in...
Binding Handles:
Binding is the process of creating a logical connection between a client program and a server program. The information that composes the binding between client and server is represented by a structure called a binding handle.
A binding handle is a data structure (internally, a pointer) that contains connection information between the client and server — like the endpoint, protocol sequence, authentication settings, and QoS.
However, applications don’t get direct access to this internal data. The structure behind a binding handle is managed entirely by the RPC runtime. Your application just passes the handle around; it can’t inspect or manipulate the contents directly.
That said, there are a few helper functions provided by the RPC API — for example, RpcBindingToStringBinding, which takes a binding handle and returns its corresponding string binding, giving you a readable version of the connection info.
We’ll look more closely at what this structure looks like (and how to inspect it dynamically) in the next part when we dig into client/server internal
In simple words, a binding handle in user code is a pointer to a data structure used internally by the RPC runtime to keep track of how to connect to the server — including things like the protocol, endpoint, and security settings
Let’s go back to our IDL file, where we defined our interface. If you remember, on the fourth line we had this:
implicit_handle(handle_t ImplicitHandle)So, what exactly is an implicit handle?
Types of Binding Handles:
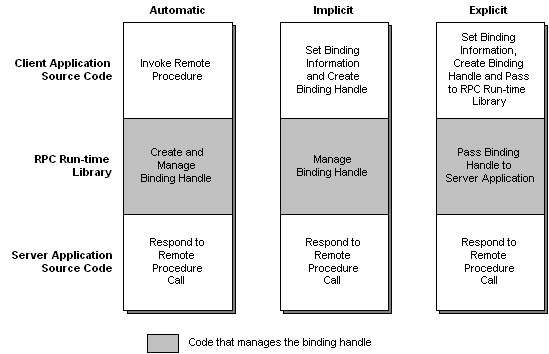
In RPC, binding handles can be automatic, implicit, or explicit — and the difference between them comes down to how much control your application has over the binding process.
- Automatic binding is the simplest. The RPC runtime takes care of everything behind the scenes — no need to write any code for binding on the client or server.
- Implicit binding gives you a bit more control. You define a handle (like we did in the IDL file), and the client can configure it before the call happens. Once it’s set, the RPC runtime takes over and handles the rest.
- Explicit binding gives you full control. You have to write code to manually create, manage, and clean up binding handles. It’s more complex, but also more flexible — which is why explicit binding is generally recommended in real-world applications.
The following diagram illustrates the differences between automatic, implicit, and explicit binding handles.
I know this still might sound a bit abstract, so let’s make it clearer by looking at how the actual code differs when using implicit vs explicit handles. That should help connect the dots.
A. Implicit
Implicit binding handles allow your application to target a specific server for remote procedure calls. They also support authenticated connections — meaning the client can provide authentication details in the binding handle, and the RPC runtime will use that information to establish a secure session with the server.
When using implicit handles, the client is responsible for setting up the binding information. After that, you don’t need to manually pass the handle to each remote function — the RPC runtime takes care of everything behind the scenes. This makes the code cleaner and easier to manage for simple use cases.
The binding information is stored in a global variable. When the MIDL compiler processes your IDL file, it generates:
- A global
handle_tvariable declaration in the header file (e.g.exampleInterface.h) - The actual variable definition in the client stub file
Your client code simply initializes the binding handle once and forgets about it — until it’s time to clean up.
Let’s look at how this works in our example (The same IDL file from the previous part).
In our IDL file, the interface definition includes the line:
implicit_handle(handle_t ImplicitHandle)Here’s what that line does:
implicit_handle(...)tells the MIDL compiler to use an implicit handle.handle_tis the data type of the handle (we’ll break this down shortly).ImplicitHandleis just a variable name — it can be any name you choose.
In the previous part, both the client and server were implemented using an implicit handle for binding.
In the client code. On line 23, we have:
status = RpcBindingFromStringBinding(stringBinding, &ImplicitHandle);This is where we actually assign the binding — the string binding is used to initialize the ImplicitHandle variable, which is the same name we declared in the IDL file.
The MIDL-generated header file (exampleInterface.h) contains:
extern handle_t ImplicitHandle;
And the client stub (exampleInterface_c.c) defines it:
handle_t ImplicitHandle;
What Is handle_t?
If we trace it through the headers, here’s what we find:
typedef I_RPC_HANDLE RPC_BINDING_HANDLE;
typedef RPC_BINDING_HANDLE handle_t;
typedef void* I_RPC_HANDLE;
So in the end, handle_t is just a void* (void pointer) — a generic pointer type. When you call:
RpcBindingFromStringBinding(stringBinding, &ImplicitHandle);the RPC runtime creates an internal structure for the binding handle (not publicly documented), and stores a pointer to it in ImplicitHandle.
That’s why we say a binding handle is just a pointer to a structure that holds connection details — like the endpoint, protocol, and auth info — between the client and server.
Later in the client code, we call the remote function like this:
PrintString("Hello, RPC Server!");Notice that we don’t pass any handle here. That’s because with implicit binding, the client stub automatically uses the global handle behind the scenes. This keeps the function call clean and simple.
One thing to keep in mind: implicit binding handles are not thread-safe. So if you're working in a multi-threaded application, it's better to avoid implicit handles and use explicit handles instead — where each thread manages its own binding.
B. Explicit
Explicit binding handles work similarly to implicit ones, but they give you more control in your client code.
Let’s say you want your client to connect to multiple RPC servers running on different machines that use the same interface. With implicit binding, you can only use a single global handle — so there’s no easy way to target different servers in the same program. That’s where explicit handles come in.
With explicit binding, you define and manage your own binding handles. You can create multiple handles, each pointing to a different server, and pass them directly as the first argument to any remote procedure call. This gives you full flexibility and is especially useful in more advanced or multi-server environments.
So now let’s see how it looks like in real code You can check out the full example here, but let’s quickly break it down.
In the IDL file, you’ll notice there’s no implicit_handle definition this time. That’s because we’re going to pass the handle explicitly in the client code.
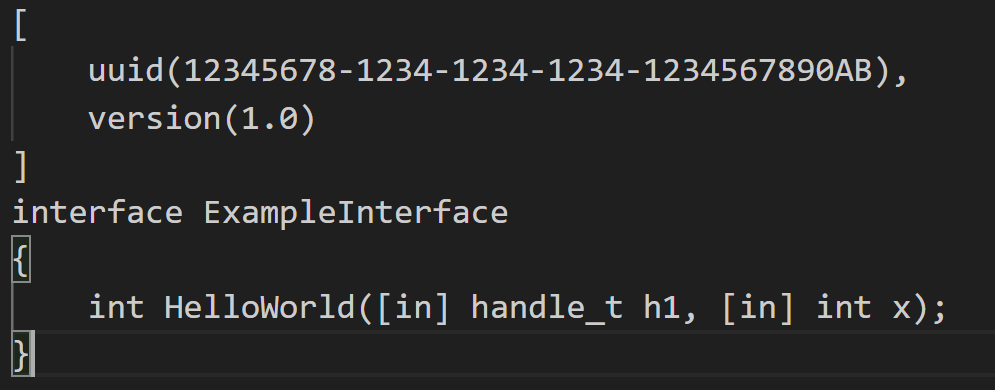
Also, in the function definition, the first parameter is the binding handle:
int HelloWorld(RPC_BINDING_HANDLE binding, int number);In the client code, we define the handle like this:
RPC_BINDING_HANDLE binding;Then we use it during the binding step and when making the remote call:
status = RpcBindingFromStringBinding(
    (RPC_CSTR)"ncalrpc:[ExampleEndpoint]",  // String binding
    &binding);

result = HelloWorld(binding, 4);
Now if you want to connect to multiple RPC servers that use the same definition of remote function, you can simply define additional binding handles in your code:
RPC_BINDING_HANDLE serverA, serverB;And use them for specific remote calls:
HelloWorld(serverA, 4);
HelloWorld(serverB, 7);
C. Automatic
Automatic binding handles are the easiest to use — and are great when your application doesn’t need to target a specific server or maintain any state between the client and server.
With automatic handles, you don’t write any binding code at all. The RPC stubs handle everything behind the scenes. That means no need to define a handle, set up a string binding, or call any binding functions — it all happens automatically at runtime.
The main benefit here is simplicity:
You write less code, and the RPC runtime handles the binding process for you.
I think that’s enough for this part. In the previous section, I mentioned that we’d dive into the RPC workflow — but I’ve decided to postpone that a little. First, we’ll cover RPC security in the next part, so that when we do get to the workflow, everything will make a lot more sense in context.
See you in the next part!