Windows Inter Process Communication A Deep Dive Beyond the Surface - Part 2

Let’s continue our journey into the world of IPC. As I mentioned in part one, we’re starting with RPC (Remote Procedure Call). I also said in my strategy that I’d begin with a high-level network overview of the technology to understand how the interface is called and to get a feel for RPC security.
But for today’s part, I won’t go over that high-level view again, since I already covered it in the blog post on Kaspersky Securelist (part one of the research) and also in a pilot article I wrote here on my blog.
I highly recommend checking out the pilot first, then reading the whitepaper for part one of the research to get familiar with the technology from a broader perspective.
In this part, I’ll focus on what RPC actually is, what the RPC client and server are, what an interface is, what the code looks like, and more.
Most of what’s in this post comes from my own work, plus a couple of solid sources — mainly MSDN and some really useful research by @0xcsandker. His work into offensive Windows IPC internals was super helpful, and I’ll be referencing it a lot here.
So, let’s dive in…
What is RPC?
Remote Procedure Call (RPC) is a technology that allows a client to communicate with a server across process or even machine boundaries — basically, it enables data exchange over a network or between local processes. That’s why RPC falls under the broader category of Inter-Process Communication (IPC) technologies, alongside others like LPC, ALPC, and Named Pipes.
As the name suggests, RPC is used to call procedures (functions or routines) that live "remotely" — meaning outside the caller's process. This could be on another machine over a network, or just in another process on the same system. Interestingly, despite the term "remote," an RPC server doesn’t actually need to run on a different machine or even in a different process — though that’s usually the case in practice. The key idea is that the client and server don’t directly share memory, and they communicate through a well-defined interface that abstracts the underlying transport details.
Architecture overview
The RPC tools make it appear to users as though a client directly calls a procedure located in a remote server program. The client and server each have their own address spaces; that is, each has its own memory resource allocated to data used by the procedure. The following figure illustrates the RPC architecture.
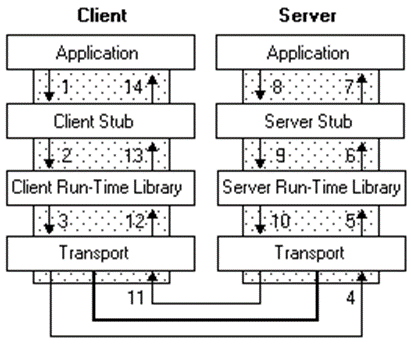
As the illustration shows, the client application calls a local stub procedure instead of the actual code implementing the procedure. Stubs are compiled and linked with the client application. Instead of containing the actual code that implements the remote procedure, the client stub code:
1- Retrieves the required parameters from the client address space.
2- Translates the parameters as needed into a standard NDR format for transmission over the network.
3- Calls functions in the RPC client run-time library to send the request and its parameters to the server.
The server performs the following steps to call the remote procedure.
1- The server RPC run-time library functions accept the request and call the server stub procedure.
2- The server stub retrieves the parameters from the network buffer and converts them from the network transmission format to the format the server needs.
3- The server stub calls the actual procedure on the server.
The remote procedure then runs, possibly generating output parameters and a return value. When the remote procedure is complete, a similar sequence of steps returns the data to the client.
1- The remote procedure returns its data to the server stub.
2- The server stub converts output parameters to the format required for transmission over the network and returns them to the RPC run-time library functions.
3- The server RPC run-time library functions transmit the data on the network to the client computer.
The client completes the process by accepting the data over the network and returning it to the calling function.
1- The client RPC run-time library receives the remote-procedure return values and returns them to the client stub.
2- The client stub converts the data from its NDR to the format used by the client computer. The stub writes data into the client memory and returns the result to the calling program on the client.
3- The calling procedure continues as if the procedure had been called on the same computer.
The run-time libraries are provided in two parts: an import library, which is linked with the application (rpcrt4.lib) and the RPC run-time library, which is implemented as a dynamic-link library (DLL).
The server application contains calls to the server run-time library functions which register the server's interface and allow the server to accept remote procedure calls. The server application also contains the application-specific remote procedures that are called by the client applications.
RPC Protocol Sequence
In the world of RPC, a protocol sequence is a key part of how the client and server know how to talk to each other. Think of it as a configuration string that tells the RPC runtime which transport protocol to use, how to handle the communication, and whether the connection should be local or network-based.
A protocol sequence isn't just a single protocol — it's a combination that defines:
- The RPC protocol (how the call is structured),
- The transport layer (how the data moves),
- And the network protocol (if applicable).
These sequences are used when registering an RPC server or connecting to one as a client. They tell the system everything it needs to set up the communication channel behind the scenes.
Microsoft supports three main types of RPC protocols:
- NCACN (Network Computing Architecture Connection-Oriented):
This is used for reliable, stream-based communication (like TCP). It’s ideal for communication over networks between different systems. Examples include ncacn_ip_tcp (RPC over TCP/IP) and ncacn_np (RPC over Named Pipes). - NCADG (Network Computing Architecture Datagram):
This supports connectionless communication (like UDP). It’s less common today because it doesn’t guarantee delivery, but it was more useful in older or performance-critical environments. - NCALRPC (Network Computing Architecture Local RPC)
This is used for communication between processes on the same machine. It avoids the overhead of network stacks and is the most efficient way to do RPC locally.
Examples of Protocol Sequences:
- ncacn_ip_tcp – RPC over TCP/IP, typically used for remote communication.
- ncacn_np – RPC over Named Pipes
- ncalrpc – Local-only RPC, used when both client and server run on the same system.
These strings are used in functions like RpcServerUseProtseq or RpcBindingFromStringBinding, where you define how the server listens or how a client connects.
You can check the full list of protocol sequence constants and their details on Microsoft’s documentation
RPC String Binding:
In RPC, a string binding is basically a human-readable description of how to reach an RPC server. It combines all the necessary connection details — like the protocol sequence, address, and endpoint — into a single formatted string. Think of it as the full “address” that a client uses to find and connect to a service.
While a protocol sequence defines how to communicate, a string binding adds where and on what port (or endpoint) to that definition.
A typical string binding looks like this:
<protocol sequence>:<network address>[<endpoint>]
- Protocol sequence: Which RPC protocol to use (e.g., ncacn_ip_tcp, ncalrpc).
- Network address: The hostname, IP address, or machine name (can be empty for local).
- Endpoint: The specific port, pipe name, or service name.
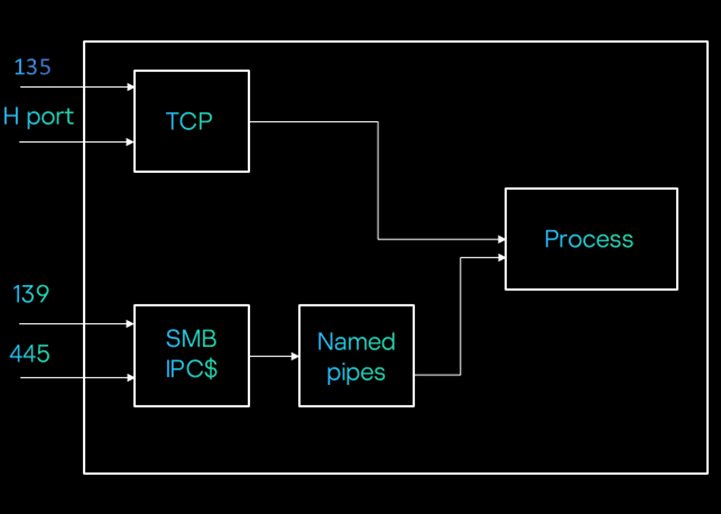
In the diagram below, we see that a process can be accessed either via TCP or Named Pipes. Based on that, the string bindings would look like this:
- TCP:
stringbinding"ncacn_ip_tcp:192.168.177.132[135]“
ncacn_ip_tcp: this is protocol sequence
192.168.177.132: this is network address
135: this is the endpoint - SMB:
stringbinding : “ncacn_np:192.168.0.1[\pipe\spoolss]”
ncacn_np : is protocol sequence
192.168.0.1 : is network address
\pip\spoolss: is endpoint
Client/Server model:
Interface:
The process exposes its functionalities through interfaces, but what the interface is?
An RPC interface describes the remote functions that the server program implements. The interface ensures that the client and server communicate using the same rules when the client invokes a remote procedure that the server offers. An interface consists of an interface name, some attributes, optional type or constant definitions, and a set of procedure declarations. Each procedure declaration must contain a procedure name, return type, and parameter list.
So, let's start with interface definition, the interface definition wrote in a special language called IDL for example:
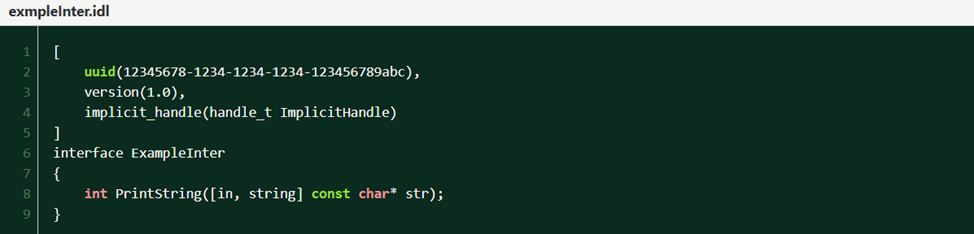
Let’s try to understand what each line means:
1- The second line contains the interface UUID, which is a GUID used to uniquely identify this interface.
2- The third line specifies the version of the interface.
3- The fourth line indicates the use of an implicit handle (we’ll explain this later).
4- The sixth line contains the interface name, which is ExampleInter in our case.
5- The final line, the eighth line, is where you define your functions. In our case, we have one function that returns an integer and takes a string as its input.
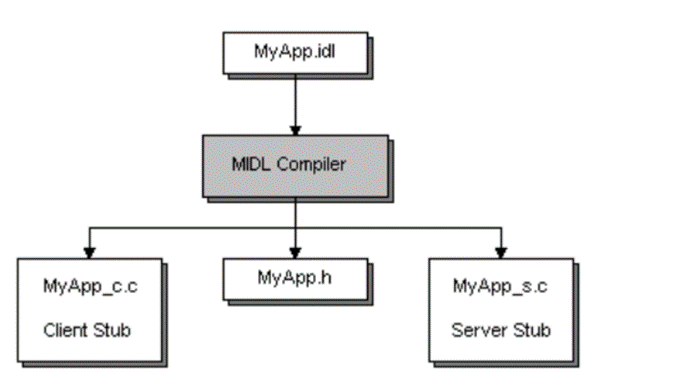
The MIDL compiler (midl.exe) generates a header file that your program includes in the client and server source files. The MIDL compiler also generates two C source files. You compile and link one of these to your client program, and the other to your server program. These two C source files are the client and server stubs as photo below
Now let’s create the same IDL file, which we’ll call exampleInterface.idl, and it will contain the same definitions we just talked about.
You can find the original file on my GitHub.
Once the file is ready, we’ll use the MIDL compiler to generate several output files. These include the interface header (which will be used by both the client and server), the client stub, and the server stub.
I’ll compile it using the Visual Studio Developer Command Prompt with the following command:
midl.exe exampleInterface.idl /app_config
I’ll explain the /app_config flag later when we talk about different handle types.
After running the compilation, you’ll get the following files:
- Interface header: exampleInterface.h
- Client stub: exampleInterface_c.c
- Server stub: exampleInterface_s.c
Server:
Inside the server, we need to implement the logic for our interface. You can check out the server code here:
1. Including Libraries
At the top of the file, you’ll notice we're including exampleInterface.h. This header is generated by the MIDL compiler and contains all the necessary declarations for the client and server stubs, as well as the interface definition. Both the server and client need this header to understand the shared interface.
2. RpcServerUseProtseqEp
RPC_STATUS RpcServerUseProtseqEp(
  RPC_CSTR     Protseq,
  unsigned int MaxCalls,
  RPC_CSTR     Endpoint,
  void         *SecurityDescriptor
);
This function tells the RPC runtime to use a specific protocol sequence with a specific endpoint for incoming remote procedure calls.
As we discussed earlier, RPC supports multiple protocol sequences (e.g., ncalrpc, ncacn_ip_tcp, etc.), each potentially with its own endpoint.
In our case, since both the client and server are running on the same machine, we’re using ncalrpc, which is optimized for local communication.
The endpoint we've chosen is "example_endpoint", and we’re skipping the SecurityDescriptor for now (it’s optional and used for access control).
3. RpcServerRegisterIf2
RPC_STATUS RpcServerRegisterIf2(
  RPC_IF_HANDLE      IfSpec,
  UUID               *MgrTypeUuid,
  RPC_MGR_EPV        *MgrEpv,
  unsigned int       Flags,
  unsigned int       MaxCalls,
  unsigned int       MaxRpcSize,
  RPC_IF_CALLBACK_FN *IfCallbackFn
);
This function registers our interface with the RPC runtime.
The first parameter is the interface handle, which is a constant (usually a pointer to a structure) generated by the MIDL compiler. It's defined in the server stub and declared in exampleInterface.h, allowing both the client and server to reference the interface specification. It contains the full interface specification.
In our code, you’ll see it passed as ExampleInter_v1_0_s_ifspec. You might wonder where that name comes from — the MIDL compiler automatically names it using this convention:
ExampleInter→ the interface name from the IDL filev1_0→ version 1.0s→ indicates this is the server-side interfaceifspec→ stands for "interface specification"
We’ll dive into the concept of handles and handle types later. The other parameters are related to interface security, and we’ll revisit them when we cover RPC security in more detail.
4. RpcServerListen
RPC_STATUS RpcServerListen(
  unsigned int MinimumCallThreads,
  unsigned int MaxCalls,
  unsigned int DontWait
);
This function tells the RPC runtime to start listening for incoming procedure calls. It effectively brings the server "online" and ready to serve clients.
5. RPC Function Implementation
int PrintString(const char* str) {
    printf("Received string: %s\n", str);
    return 3;
}
This is our example RPC function. It receives a string from the client, prints it to the console, and returns the integer 3.
This function matches the signature declared in the IDL file — the stub code handles the marshaling and unmarshalling of parameters automatically.
6. Memory Management Functions
At the end of the file, you’ll usually find two memory management functions (MIDL_user_allocate and MIDL_user_free) which are required by the RPC runtime for memory allocation during marshalling and unmarshalling. These are simple wrappers around malloc and free, but they must be defined explicitly for the generated stubs to work.
How to Compile the Server?
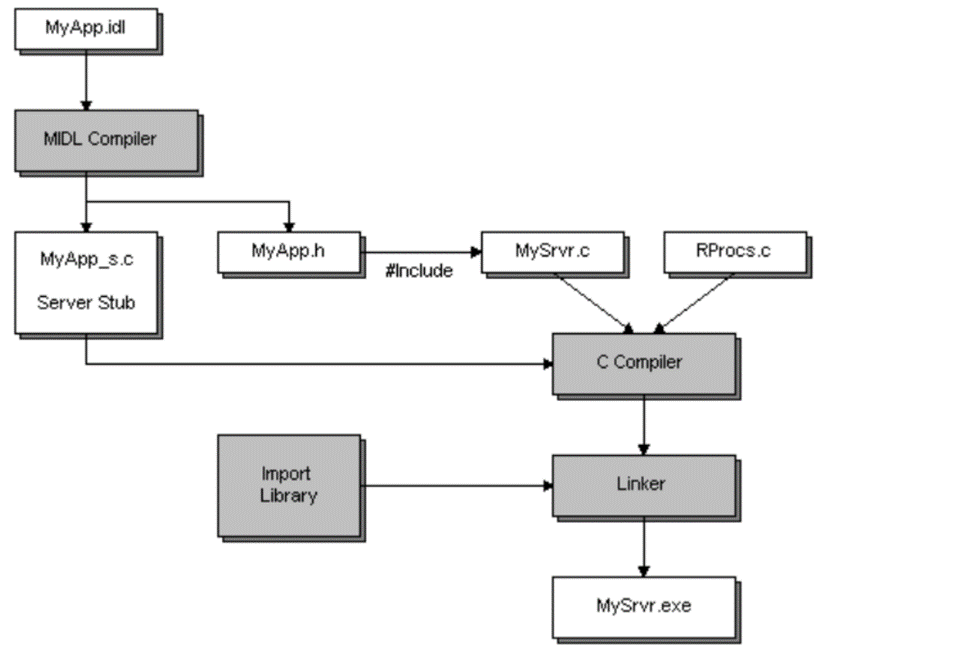
As shown in the Microsoft illustration below, a MIDL file (in this case, MyApp.idl) defines the interface. The MIDL compiler processes this file and generates two important outputs:
MyApp_s.c: the server stubMyApp.h: the interface header
The server’s C source file — in Microsoft’s example, Mysrvr.c — must include MyApp.h to access the interface definitions.
In that setup, the server logic is split across two files:
Mysrvr.c: contains the code to initialize and run the RPC server.Rprocs.c: contains the actual implementation of the remote procedures.
In our case, we don't use a separate Rprocs.c file — we implemented the RPC function directly inside the server source code.
To build the final executable (Mysrvr.exe in the example), Microsoft’s setup compiles Mysrvr.c, Rprocs.c, and MyApp_s.c, and then links them with the RPC runtime library (Rpcrt4.lib) along with any other required libraries.
Now Let’s Compile Our Server
We’ll follow a similar process to compile our own server. I’m using the Visual Studio Developer Command Prompt and the cl.exe compiler that comes with it.
To compile the server, just include your main server source file and the generated server stub, and link against the RPC runtime library:
cl server.c exampleInterface_s.c /link rpcrt4.libThis will generate server.exe, which is your compiled RPC server.
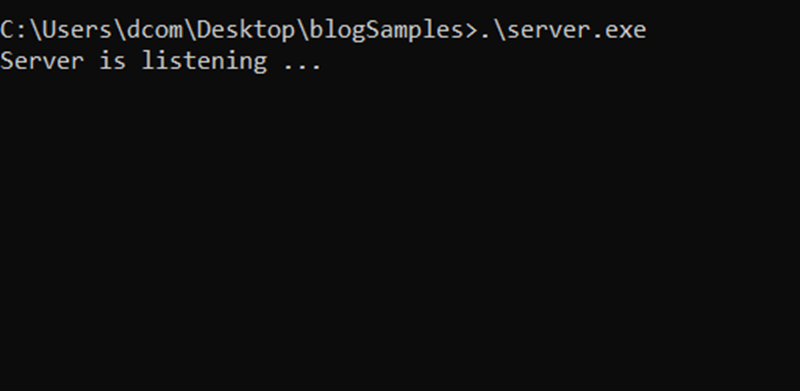
Now if you run the server, you should see output like in the photo below. If everything’s set up correctly, the server will start listening and wait for client calls.
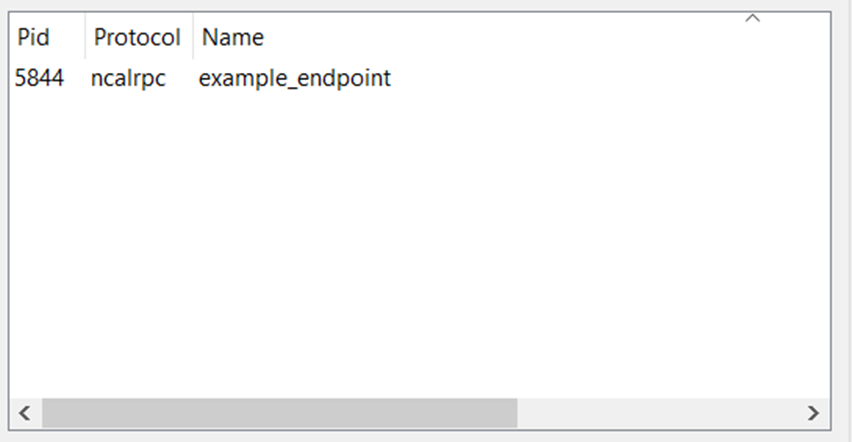
Now let’s go a step further and take a look at what RPC information is exposed by our process (server.exe).
To do that, we can use a tool called RpcView — it lets you inspect all the RPC endpoints and interfaces currently registered by processes on your system.
In the screenshot below, you can see that RpcView successfully identifies both our endpoint and our interface, confirming that the server has registered everything correctly and is ready to accept RPC calls from clients.

Client
Now for the final piece — the client.
In the client code, we need to connect to the server, bind to the interface, and make the actual RPC call.
Let’s walk through the main steps:
1. RpcStringBindingCompose
 RPC_STATUS RpcStringBindingCompose(
  RPC_CSTR ObjUuid,
  RPC_CSTR ProtSeq,
  RPC_CSTR NetworkAddr,
  RPC_CSTR Endpoint,
  RPC_CSTR Options,
  RPC_CSTR *StringBinding
);
This function creates a string that represents the full binding to the server — it combines the protocol sequence, endpoint, and other optional parts into a single connection string (string binding). For our case, we only care about the protocol sequence and the endpoint, since the communication is local. That means we don’t need to specify a network address, and the other parameters aren’t relevant in our context.
In our example, since we're using local RPC, the result will look like this:
ncalrpc:[example_endpoint]
This string will be used in the next step to create an actual binding handle.
2. RpcBindingFromStringBinding
RPC_STATUS RpcBindingFromStringBinding(
  RPC_CSTR           StringBinding,
  RPC_BINDING_HANDLE *Binding
);
This function takes the string binding we created and returns a binding handle — a structure used by the RPC runtime to manage the connection.
In our code, we pass this handle to the variable that represents the implicit binding handle. This handle is already defined by the MIDL compiler in the client stub and declared in exampleInterface.h.
As mentioned earlier, we’ll go deeper into handle types and binding mechanics later on.
3. Making the RPC Call
int result = PrintString("Hello, RPC Server!");
printf("Server returned: %d\n", result);
This is the actual remote procedure call.
We're calling the PrintString function defined in the interface — it sends a string to the server, the server processes it, and returns an integer (in our case, the number 3).
4. Memory Management Functions
At the end of the client code, you’ll also see memory management functions (MIDL_user_allocate and MIDL_user_free) — just like on the server side. These are required by the RPC runtime to handle dynamic memory during parameter marshalling
How to Compile the client?
As shown in the Microsoft illustration below, the first step is to define the interface in a file called MyApp.idl. The MIDL compiler processes this file and generates two key outputs:
MyApp_c.c: the client stub, which contains the code needed for making RPC calls.MyApp.h: the header file with interface definitions shared between client and server.
The actual client code is written in MyClnt.c. In a real-world project, the client might be split across multiple C source files, all of which would be compiled and linked together. But for simplicity, this example uses a single source file.
To build the final client executable (MyClnt.exe), both MyClnt.c and MyApp_c.c are compiled and linked together along with the RPC runtime library (Rpcrt4.lib) and any other required libraries.
Now Let’s Compile Our Client
To compile the client, we simply compile the client source file along with the client stub generated by the MIDL compiler, and link against the RPC runtime library. You can do this using the following command:
cl client.c exampleInterface_c.c /link rpcrt4.libThis will produce the client executable.
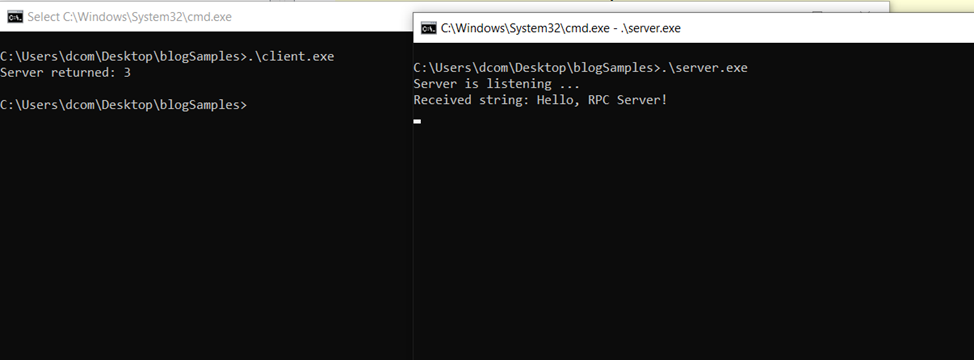
Now that we have both the client and the server built, we start by running the server first so it begins listening for RPC calls. Then we run the client. As shown in the screenshot below, the client successfully connects to the server, makes the remote procedure call, and receives a response.
Well-Known vs. Dynamic Endpoints
Now that we’ve built both the client and the server and confirmed that communication works, let’s talk about endpoints, which we briefly mentioned earlier when discussing string bindings.
When you start your RPC server, one of the things it must do is register an interface (as we already did using RpcServerRegisterIf2). But simply registering the interface and choosing a protocol (like ncalrpc, ncacn_np, or ncacn_ip_tcp) isn't enough — the server also needs to know where it should listen for incoming calls (The whole string binding). That’s where the endpoint comes in.
Each protocol requires a specific kind of endpoint:
- ncalrpc (used for local communication) needs an ALPC port name, like example_endpoint.
- ncacn_np (Named Pipes) needs a Named Pipe name, like \\pipe\\MyRPCPipe.
- ncacn_ip_tcp (network communication) needs a TCP port number, like 135 or 9999.
Well-Known Endpoints:
In our project, we used ncalrpc with a custom endpoint called example_endpoint. This is an example of a well-known endpoint — both the client and the server know the exact protocol and endpoint name ahead of time. The client can hardcode the values, compose the binding string, and directly connect to the server.
This approach is simple and perfect for testing or internal tools where you control both sides of the communication.
Example (what we already do):
Server:
RpcServerUseProtseqEp(
    (unsigned char *)"ncalrpc",
    RPC_C_LISTEN_MAX_CALLS_DEFAULT,
    (unsigned char *)"example_endpoint",
    NULL
);
Client:
RpcStringBindingCompose(
    NULL,
    (unsigned char *)"ncalrpc",
    NULL,
    (unsigned char *)"example_endpoint",
    NULL,
    &stringBinding
);
Dynamic Endpoints
Now imagine you’re building a more flexible or network-based RPC server using ncacn_ip_tcp. You might not want to hardcode a TCP port, or maybe you want Windows to assign one automatically to avoid conflicts. That’s where dynamic endpoints come into play.
Instead of calling RpcServerUseProtseqEp (which requires an explicit endpoint), you'd call RpcServerUseProtseq, and let the system assign an available port.
But there’s a catch — if the server chooses the endpoint dynamically, how does the client know where to connect?
That’s where the RPC Endpoint Mapper comes in. It's a built-in Windows service that tracks dynamic endpoint registrations. When the server registers its interface and endpoints with the mapper using RpcServerInqBindings and RpcEpRegister, the client can then query the mapper to find the correct port or pipe.
Server using dynamic TCP endpoint:
RpcServerUseProtseq(
    (unsigned char *)"ncacn_ip_tcp",
    RPC_C_LISTEN_MAX_CALLS_DEFAULT,
    NULL
);
RpcServerInqBindings(&bindingVector);
RpcEpRegister(ExampleInter_v1_0_s_ifspec, bindingVector, NULL, NULL);
Client:
RpcStringBindingCompose(
    NULL,
    (unsigned char *)"ncacn_ip_tcp",
    (unsigned char *)"ServerName",
    NULL,
    NULL,
    &stringBinding
);
Here, the client doesn't know the exact port, but it can resolve it through the endpoint mapper.
Now let’s take things a bit further by modifying our client and server to use dynamic endpoints, and then we’ll inspect the endpoint mapper database to confirm that everything was registered correctly.
As I mentioned earlier, switching to dynamic endpoints is straightforward — you just need to update a couple of function calls in both the client and server.
You can find the full updated source code for the client and server.
Once you compile both files successfully, you should see the exact same output as with our original static (well-known) endpoint setup — the client connects, the server responds, and everything works.
Inspecting the Endpoint Mapper
Now for the fun part — let’s take a peek into the RPC Endpoint Mapper database to see if our interface was properly registered.
We’ll use a tool from Impacket called impacket-rpcdump. This script allows you to remotely dump the contents of the endpoint mapper database of any Windows machine. What’s especially interesting is that by default, this action doesn’t require authentication.
Note: You can configure a policy to require authentication by navigating to:
Computer Configuration → Administrative Templates → System → Remote Procedure Call → Enable RPC Endpoint Mapper Client Authentication
To run the script, use the following command:
impacket-rpcdump <your-server-ip>After running it, you should see your registered RPC interface listed in the output — including the UUID, version, and the dynamically assigned endpoint (like a TCP port). This confirms that your server successfully registered with the endpoint mapper and that the dynamic binding is discoverable as the photo below shows

Hope the basics of the RPC server/client model are clear by now, and you have a good idea of how to build both sides. I’ll wrap things up here to keep this part from getting too long. In the next section, we’ll complete the bigger picture by diving into binding, handle types, and how the actual RPC workflow happens under the hood.